|
| The best little car corral in Arizona. |
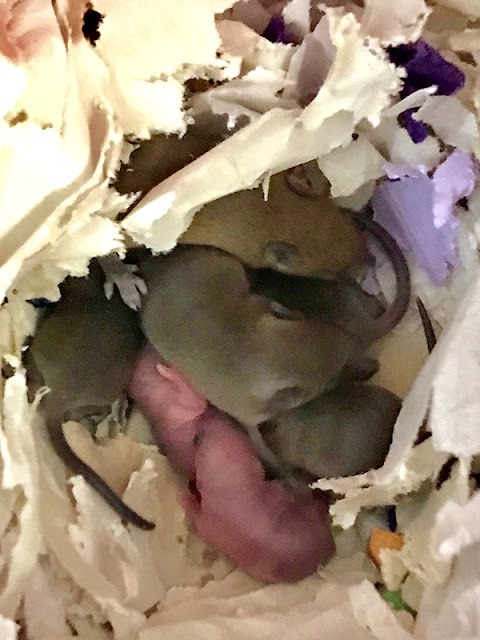
Many people who flock to the American southwest after developing environmental illness have no idea that car camping or parking in rural areas will leave their car vulnerable to damage from local critters like mice, rats, squirrels, and rabbits, to name a few. During nesting seasons, these animals will seek out the dark, protected, relatively insulated areas of a car (e.g. under the hood, in engine) in which to build nests for their young. Many a morning when I checked under my hood, I found squirrels, rabbits, and mice just hanging out in the engine. I have removed several nests made of sticks, string, and found materials from the engine area. I have had to have wiring repaired where rodents have chewed through on the wires to my air conditioner fan and other areas on three separate occasions. Not only is this annoying, inconvenient and expensive over time, but it is also dangerous — both for the animal and you! A neighbor of mine once had their car explode into flames as they were driving because the wires on the their brakes had been destroyed by rodents. Luckily they were able to pull over and slow the car down in time to jump out.
The average person who finds themselves with a rodent problem in their vehicle will usually just put some dryer sheets in the area or some peppermint oil and call it a day. But those who are chemically sensitive have to get more creative than that, as we can have severe physical reactions to all the typical solutions. One environmentally sensitive friend of mine recommended I get a mechanic to close off all openings to the car engine using grating and metal sheeting. Depending on the car, that could get tricky and for some of us, it is difficult to find a mechanic to work with that won’t contaminate our car in some way. I tried leaving my hood open at night as others had advised, but some nights it was just way too windy to do that. I even ordered some coyote urine to sprinkle around my car to ward off small animals, but I reacted terribly to the strong scent and had to abandon the idea.
Ultimately, I chose to build a small “car corral” to enclose my car year-round. Three out of four sides have metal sheeting that goes a foot into the ground to prevent the rodents from burrowing underneath to access the car. The front gate area has large concrete bricks buried at the front line for the same purpose. The project cost me around $1,600 but your cost may vary depending on local prices of materials and labor. (I also had some inefficiencies in how mine was done that added some costs to the overall amount.)
 |
| Before shot: The original car corral site. |
Main materials needed
• 64′ long x 4′ high 26 gauge metal siding cut into 3′ wide pieces (possible brands: Fabral, Metal Sales; possible sources: ABC Supply, ProBuild, Kay Supply, Lowe’s, Home Depot)
• (8) cement blocks – 6″ x 14″ from Home Depot
• ~ 13 posts for frame
• ~ 68′ of piping for frame
• enough bags of cement to fill cement bricks
• screws/bolts
• (8) cement blocks – 6″ x 14″ from Home Depot
• ~ 13 posts for frame
• ~ 68′ of piping for frame
• enough bags of cement to fill cement bricks
• screws/bolts
Depending on the design of your gate and closing system:
• 2 gate frames – 5′ wide each – fabricated by local welder
• handle for gate
• closure for gate
• hinges for gate
• (2) poles for gate “open” position
• (2) chain links for gate “open” position
• handle for gate
• closure for gate
• hinges for gate
• (2) poles for gate “open” position
• (2) chain links for gate “open” position
There may be other materials I am forgetting or unaware of since I did not build it myself. The person you hire should be able to determine all hardware needed.
Approximate cost
$362 – metal siding
$100 – posts and cement bricks
$150 – clear/level land with tractor
$180 – labor to dig trenches
$800 – labor, additional materials
$1592 TOTAL
$362 – metal siding
$100 – posts and cement bricks
$150 – clear/level land with tractor
$180 – labor to dig trenches
$800 – labor, additional materials
$1592 TOTAL
Step One: Determine dimensions
I worked with a local handyman named Walt who is a skilled craftsman and metalworker. First we determined how big the corral would be based on my car’s outside measurements. We decided on 12 feet x 20 feet for the overall dimensions. I wanted to be able to open the doors on both sides of the car at once and have a few feet in the front and back for clearance.
I worked with a local handyman named Walt who is a skilled craftsman and metalworker. First we determined how big the corral would be based on my car’s outside measurements. We decided on 12 feet x 20 feet for the overall dimensions. I wanted to be able to open the doors on both sides of the car at once and have a few feet in the front and back for clearance.
Step Two: Order materials
Once you know the overall dimensions, you can figure out the quantity of materials needed and place your orders well ahead of time. Since I was building a 12′ x 20′ car corral, I needed approximately 64 feet of metal sheeting. The metal sheeting comes in heights of 4 feet; that would provide enough clearance for 1 foot below ground and 3 feet above ground. I also needed to purchase fence posts and the frame for the front gate. The rest of the materials (hinges, screws, bolts, etc.) were provided by Walt, who charged me for them in his fee. Depending on where you purchase your materials, there may be a several week wait so be sure to factor that lead time into your schedule.
Once you know the overall dimensions, you can figure out the quantity of materials needed and place your orders well ahead of time. Since I was building a 12′ x 20′ car corral, I needed approximately 64 feet of metal sheeting. The metal sheeting comes in heights of 4 feet; that would provide enough clearance for 1 foot below ground and 3 feet above ground. I also needed to purchase fence posts and the frame for the front gate. The rest of the materials (hinges, screws, bolts, etc.) were provided by Walt, who charged me for them in his fee. Depending on where you purchase your materials, there may be a several week wait so be sure to factor that lead time into your schedule.
 |
| Clearing the land. |
Step Three: Clear land, level site
The next step was to clear the area of debris and plants and level the site. I had to hire a local worker to bring his small tractor out to complete the job. That cost me $150. If I had the same person dig the trench for metal siding I might have saved myself some money, but as it turned out, I used two different people. [Note:Another option here would have been to pour a concrete pad to put the car corral on, eliminating the need to bury the siding into the ground. That would have saved on cost and labor to dig the trenches, but would have added a lot more costs for the cement work. I chose the less expensive option that would leave the lighter footprint on the earth.]
The next step was to clear the area of debris and plants and level the site. I had to hire a local worker to bring his small tractor out to complete the job. That cost me $150. If I had the same person dig the trench for metal siding I might have saved myself some money, but as it turned out, I used two different people. [Note:Another option here would have been to pour a concrete pad to put the car corral on, eliminating the need to bury the siding into the ground. That would have saved on cost and labor to dig the trenches, but would have added a lot more costs for the cement work. I chose the less expensive option that would leave the lighter footprint on the earth.]
 |
Step Four: Measure corral and dig trenches
Next I had to measure out the dimensions of the corral and mark the areas before digging. Once you layout the sides with a tape measure (I used a stick to draw the rectangle out in the earth), you’ll want to measure on the diagonals to insure 90 degrees angles on all sides. Then came the fun part: digging trenches 1 foot deep by about 3 inches wide around three of the four sides of the car corral. I tried digging them myself to save money but ended up having to hire someone with muscle to finish the job. I wet the area with a hose the night before and morning of to make the digging easier.
Next I had to measure out the dimensions of the corral and mark the areas before digging. Once you layout the sides with a tape measure (I used a stick to draw the rectangle out in the earth), you’ll want to measure on the diagonals to insure 90 degrees angles on all sides. Then came the fun part: digging trenches 1 foot deep by about 3 inches wide around three of the four sides of the car corral. I tried digging them myself to save money but ended up having to hire someone with muscle to finish the job. I wet the area with a hose the night before and morning of to make the digging easier.
 |
| Different widths for front and side trenches. |
The way Walt decided to do the front gate required that we dig a wider, more shallow trench in the front than for the sides and back of the corral. The front trench had to be about 6 inches deep and 14 inches wide – deep and wide enough for large cement bricks that would be placed along the front rim, filled with concrete, and then covered with dirt to prevent the rodents from burrowing in under the gate.
 |
| Putting posts and connecting pipes in. |
Step Five: Pound in posts, connect with pipes
After digging the trenches, Walt then pounded in posts on all corners and along the sides. Then he connected all the posts with pipes he scavenged from our property (we found them just laying around from a previous job) to create the framework for the metal sheeting. The pipes had to be cut to fit on site.
After digging the trenches, Walt then pounded in posts on all corners and along the sides. Then he connected all the posts with pipes he scavenged from our property (we found them just laying around from a previous job) to create the framework for the metal sheeting. The pipes had to be cut to fit on site.
 |
| Stabilizing the corners. |
Step Six: Construct front gate
Once the corral framework was up, Walt focused on the front gate, filling the buried bricks with concrete, and putting in the posts for the gate to swing on.
Once the corral framework was up, Walt focused on the front gate, filling the buried bricks with concrete, and putting in the posts for the gate to swing on.
 |
| Concrete being poured in and around the bricks. |
 |
| Concrete being poured around gate posts. |
 |
| Hinging the pre-fabricated gate frame. |
Step Seven: Attach metal sheeting to perimeter
Once the frame for the corral and front gate are assembled, you can then attach the metal sheeting to the piping. I chose metal sheeting to match the color of the garage and shed to keep it color coordinated with the accessory buildings on the property. When the metal sheeting is in place, you can then refill the trenches with the surplus dirt on both sides of the metal, tapping the dirt down with the back of the shovel to create a flat, even surface.
 |
| Finished car corral with gate open. |
Step Eight: Front gate details
Your worker will have to decide what sort of handle to put on the gate to open it with, how to keep it in a closed position, and what sort of poles and chains to use to keep the gate in “open” position, etc. Here is what Walt did:
 |
| Gate handle. |
 |
| Chain and pole for keeping gate in “open” position. |
This car corral is really a work of art in how well it is constructed and how well it keeps critters out. I am so thankful for Walt’s ingenuity and attention to detail. He is a real pro at figuring out ways to avoid using solvents, glues, and other chemicals to get the job done for those of us with chemical sensitivities. I hope my sharing this will help others to build their own car corrals and save their cars from rodent damage.
 |
| Finished car corral. |
A few weeks after the car corral was completed, a sunflower began to grow. Somehow, it seemed symbolic – nature’s way of blessing my new car home.
 |
| Sunflower in car corral. |
Disclaimer: The above materials, costs, and steps taken to build this car corral are approximations and should not be taken literally. If you decide to build your own car corral, please work out all details with the person building your corral. My article should be used as a guide or for inspiration only.